A whimsical place to play, where paper and ink become one.

Friday, December 22, 2017

Little Darlings Tinsley ~ A Fairy Christmas Card

Welcome back friends,
For today's post I have colored up "Tinsley" everyone knows how I love fairies....but this is even better.... its a fairy stamp AND She is on sale in the Little Darlings ONLINE STORE so don't wait on this....


In this project I have used the beautiful Polkadoodles 6x6" Winter Land paper pack
along with a few embellishments from Stampin' Up!


The stamp was colored with Copic markers in the following colors:
E000, E00, E11, E21, E41, E43, E44, E84, E87
B41, B91, B93, B95, B97, B99
C2, C4, C6, & R20


Thank you for stopping by today. We would love for you to visit the Little Darlings online store. Don't forget this stamp is on sale currently and we have a bunch of clearance stamps AND dies also available. This is the best time to shop ;-)

Don't forget to make time for your crafty side some time soon. It is good for your inner peace even when life isn't always peaceful. Love, Melanie


Tuesday, December 19, 2017

Elizabeth Craft Designs Monthly Challenge ~ Backgrounds

Hello Friends,

Today I am sharing a really fun birthday card made from some really adorable Elizabeth Craft Designs' Dies. This card is for our Monthly Challenge over on the ECD Challenge Blog. Check it out for your chance of winning this weeks gift card.

This card was both simple and really fun to make. I absolutely love these new stamp & die cut sentiments. Gives you so many options with one stamp die duo. I love ways to make my money go farther and these fit that and then some.... We actually have two different coordinating sentiment sets like this now so make sure to check them both out.

Designers Tip: Since the stamps are clear I found it much easier to die cut the dies out first then to stamp straight down onto the pre cut piece of card stock. Here is a close up so you can see all the detail...


Elizabeth Craft Designs Product List:

Perfect Purple Soft Finish Card Stock  
White Soft Finish Card Stock
Perfect Pink Soft Finish Card Stock
Cafe Soft Finish Card Stock
Pale Peach Soft Finish Card Stock 
Color of Puppies Girl by ModaScrap
Thinking About Polinesia  By ModaScrap
Kaleidoscope Background Die 
Stitched Rectangles Dies
Small Cup Cake Dies 
Sentiments 1 - Celebrations  Stamps
Sentiments 1 - Celebrations Dies 


I truly hope I have inspired you today. That is my daily goal. If you ever have any questions or have comments I would love to speak with you. Thank you for stopping by. Happy Craftiness! Melanie


Monday, December 11, 2017

Elizabeth Craft Designs ~ Whimsical Winter Bears

Hello My Friends,


Today I have a fun wintry card to share with you all. This card is for Elizabeth Craft Designs and is focused on coloring these precious "Winter Bears". I absolutely love how the Copic colors turned out and how they matched the ModaScrap paper line so perfectly.

To create this card simply follow these easy instructions:
  1. Color your "Winter Bears" using Copic markers (listed below) and die cut using the coordinating die set. When coloring choose colors that match your focal paper. "Fly & Scrap" by ModaScrap was featured here.
  2. Cut your base card at 4" 1/4" x 11" score and fold in half from any dark colored Soft Finish card stock. Perfect Purple was used in this sample.
  3. Cut your focal paper to 4" x 5/1/4"
  4. Using the Fitted Circle dies cut our windows in the top focal paper. This adds depth and contrast to your card, especially if you use foam tape to pop up the layers even more like seen here.


5. Lastly used two layers of foam tape as seen in photo above and then using lots of the accessory pieces ad layers with some pieces glued to the card base and some glued to the top layer.


Elizabeth Craft Designs Supplies Used:

Winter Bears Stamp Set
Winter Bears Die Set
Fitted Circles Dies
Fly & Scrap 12x12" Paper <<<<<< THIS PAPER IS BEAUTIFUL!!!!!!!!
Perfect Purple Soft Finish Card Stock
Kid's Choice Glue

Other Supplies Used:

Copic Markers in following colors; B0000, B000, B01, B02, BV000, BV00, BV04, G40, G43, Y04, Y08, C0, C03, C04, C05, C06, C09
Foam Tape

I hope you have enjoyed my project today ad I have inspired you to get into that craft room and make something beautiful. much love, Melanie

Friday, December 8, 2017

Elizabeth Craft Designs Stylish Snowman

Hello There,

With the chilly days quickly approaching I just had to play with this adorable Stylish Snowman die set. I love how many options you have with the set. I used a typical top hat and scarf but you can also dress up your snowman with two other hats OR EVEN reindeer antlers, How cool is that?


There is only one stamp used in this card and that is for the sentiment "I melt you" from the Holiday Cheer clear stamp set.


To create the rest of this card simply follow the following cutting instructions:
  1. For card base cut a piece of dark card stock to 6"x12" and score/fold in half.
  2. From the "It's Christmas Time" 12x12 paper pack cut a 5 3/4 x 5 3/4" square of this adorable snowy paper, attach to card front.
  3. Use "Adventure Edges" die set to create the snow in the scene with white Soft Finish card stock.
  4. The same two card stocks were used to create the sentiment from the "Stitched Fishtails" die set.
  5. Using the "Stylish Snowman" die set along with Black, white, red, and a tiny bit of orange card stock you will cut out each piece. A simply pair of tweezers from your bathroom can be an invaluable tool for the tiny pieces. The focus to detail with ECD dies really sets them apart from other competitor brands.
  6. For a little added texture a white gel pen was used for the tiny dots on the hat and scarf. This little snowman us also a little sassy with his hands on his waste.... hee hee

Other Supplies Used:
Black Card Stock
White Gel Pen

I have faith that I have inspired you today. To purchase all your Elizabeth Craft Designs dies along with many other amazing products simply visit their Online Store or their Company Blog. 
Have a beautiful day! Melanie 

Thursday, December 7, 2017

Little Darlings "I Can't Reach" Christmas Card

Hiya Friends,

Today I have a festive Christmas card to share with you made with Little Darlings products. This is such a cute stamp. It is called "I Can't Reach", isn't it adorable? 


Below is a close up of my coloring.


 I have used Copic markers in the following colors to hand color my stamped image. 

E000, E00, E11, E21, E51, E53, E59, E55
G03, G05, G07, G40, G43, G46
 Y13, Y15, Y17
B23, B24, B26
R35, R37, R39 

For embellishments I have used a wooden bow element painted with some Wink of Stella. Copper Trim for the mesh bow, and washi tape for the horizontal striped piece of card stock along the bottom of the card. 

Thank you for stopping by today. May your day be blessed and filled with creativity. Melanie

Wednesday, November 22, 2017

LDRS Creative Holiday Ornament Shaker Card

Welcome friends,

I are super glad you chose to visit my blog today. LDRS Creative has some amazing holiday dies in their new release and I decided I would create a fun card without using any stamps. I just love the way it turned out.


This classy gold and ivory non traditional themed Christmas card is just stunning. When I saw these ornament dies I knew right away that I wanted to use them against a black background with gold and ivory. . . . These dies are so easy to use and always cut like butter. I love all the detail they give to my projects. Make sure to check out our entire new line of 4th quarter products.


LDRS CREATIVE INGREDIENTS:
Grace Ornament Die Set
Peace Ornament Die Set
Christmas Word Die
Bright Word Die

Other Ingredients:
Stampin' Up! Basic Black and Very Vanilla Card Stock
Stampin' Up! Gold Foil Paper
Stampin' Up! Gold Enamel Shapes (Stars)
Stampin' Up! Fallen Embossing Folder
Stampin' Up! Gold & Ivory Ribbon


Here is a close up of the Grace Ornament Die just to show you the detail of these beautiful dies. I've used a gold foil paper that I had in my stash to give it even more of a shine.

If you have any questions please feel free to contact me. I am always just a message away. Have an amazing day! Melanie

Tuesday, November 21, 2017

Elizabeth Craft Designs Pop Up Challenge!!!!

Hi Friends,

I have a fun little project to share with you all today. The Challenge theme for the month over on the  Elizabeth Craft Designs Challenge Blog is Pop Up Cards. I decided to use some of our beautiful new papers by ModaScrap called Magic Mountain and to create a masculine card.

The card front is quite simple using the fun wood designer paper as the focal and simply stamping the sentiments out and using Elizabeth Craft Dies to display them easily on the card front. 


The sentiments are from two stamp/die sets. The Happy Birthday sentiments across the top of the card was created using the Banner Sentiments along with the coordinating Banners Dies. 

To create the "Time to Celebrate" sentiment above, I used the Birthday Sentiments Stamp Set along with the coordinating  Labels 1 die set. These two sets really give you a lot of options and are a great value for the money.

Now for the fun that happens when you OPEN the card....  


I absolutely love creating scenes. This scene was created using a few different items. The sentiment was made from the same set referenced above. The stamp sets used for the tree and deer are Holiday Trees and Ornaments, Reindeer's and Birds, and Adventure edges for the grass.


And lastly the General Pop Up dies, which makes the entire card.

Check out all the details for the giveaway below.... Can't wait to see what you create!!!

**************
For today's challenge Elizabeth Craft Designs are giving away a $20 Gift Card to use on our website to 3 winners.

To enter simply leave a comment on the Elizabeth Craft Designs Challenge post and tell us "What Elizabeth Craft Designs dies or stamp sets would you use with the General Pop Ups die set if you were making a Pop Up Card?”

We will select 3 lucky winners in a random drawing

The winners will be announced on Friday, November 24th on the Elizabeth Craft Designs blog.

*************

Friday, November 17, 2017

Elizabeth Craft Designs' Gingerbread Home


Welcome Back Friends,
DT Melanie here with you today with a super cute project. Playing with the "Gingerbread Home" die set made me feel like I was playing with paper dolls again, like when I was a kid. I bet a lot of you remember those days :-)
The Gingerbread Home set is just adorable... lets take a closer look...

To create this card simply follow these steps.
Step 1: Cut a 5" x 10" piece of red card stock and fold to create your card base.

Step 2: Cut a piece of speciality paper measuring 4.75" x 4.75" and attach to the front of your card. "It's Christmas Time" paper by ModaScrap was used here.

Step 3: Die cut all your pieces. Here are a few photos showing some of this process.


The full house die from dark brown card stock and the outlined scalloped shape from ivory card stock


The candy cane cut at the same time using one die for red and the other for the white.


Then when you get to the gingerbread man and lady then fun begins to happen. Make sure to use double sided adhesive to help with assembling these pieces. The pieces are interchangeable so cut your self numerous pieces and play around with the layers. In lay a few pieces and look what you can make....


When you are done with all the die cutting simply glue all pieces together to create a fun and inviting gingerbread scene.

Step 4: Creating the Sentiment:
The sentiment was created by using a portion of one stamp from the "Holiday Cheer" clear stamp set. The stamp itself reads "Candy Cane Wishes and Mistletoe Kisses" and looks like this.


Carefully stamp just the "Candy Cane" portion first, as seen below, onto a Dotted Scalloped Rectangle die. Next carefully ink up just the word, "Wishes", and stamp it below the previous stamped words.


Lastly to fit the sentiment into the scene without over lapping anything simply snip off the edge of the dotted scalloped rectangle and glue to the top left hand side of your card.


I hope you have enjoyed this tutorial today and that it inspires you to get crafty. Feel free to contact me with any questions. Happy Stamping!!! Melanie

Monday, November 13, 2017

Elizabeth Craft Designs' Snowglobe Shaker Card

Hello My Crafty Friends,

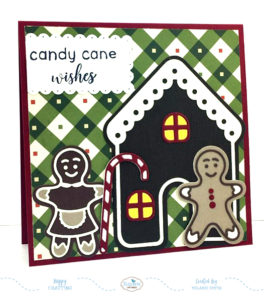
I have something fun to share with you today, a super fun shaker card. I have to admit I have not made many shaker cards so this was a labor of love. It was really fun though and I encourage all of you to give it a try!
Here is how I created this card....

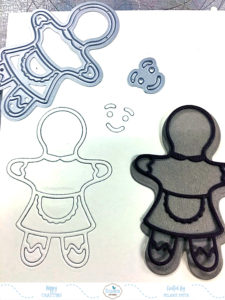
Step 1: Using the "Snowman & Gifts" clear stamp set along with the coordinating dies color and cut these adorable snowmen. Copics were used in the samples in this post.

Step 2: Cut a red card base measuring 5.5' x 11" and fold in half.

Step 3:  Cut a piece of silver foil card stock to 5.25" x 5.25" square and attach to card front.

Step 4:  Cut a piece of holiday patterned paper, from the "It's Christmas Time" Paper Pack from ModaScrap, to 5" x 5" and adhere to the card front.

Now to create the snowglobe...

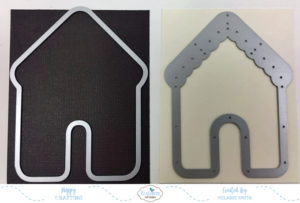
Step 5: With a die cut machine and the "Snowglobe Scene" die set, cut one snow globe as seen in the photo below, and cut two rings by placing two circle dies inside each other as shown in the photo. Circle dies from the "Fitted Circles" were used to achieve the perfect size ring. From the largest circle die also cut 1 piece of clear acetate so that it forms a solid circle rather than a ring.


You should now have the following pieces... plus one solid acetate circle the size of the globe itself.


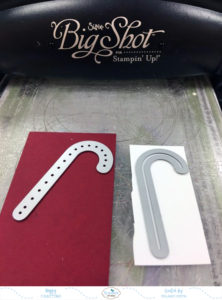
Step 6: Cut a circle from the snowglobe die with ModaScrap "It's Christmas Time" paper. You will trim off the bottom of the globe, because you just need the circle. Then using the slope die simply cut a piece of light blue Soft Finish Card Stock to act as snow for our snowy scene.


Now you are ready to assemble the snowglobe as seen here in the picture below. You will layer your pieces in the following order.
  • Attach the full Snowglobe cut in step 5 to the front of the card.
  • Next layer the spotted background circle and the snow bank piece onto the snowglobe base, these were cut in step 6.
  • Add your colored snowmen.
  • Take one of the brown rings and glue it around the outer edge of the snowglobe. This will act as a guide in the following steps.
  • Using foam strips stick down an entire ring of tape which gives you the depth that the sequins will need to move around.
  • At this point it is good to use an embossing buddy over the surface of your scene so that the sequins will not stick once enclosed inside.
  • With the last ring and the acetate glue these together being very careful not to get glue onto the acetate where it might show.
  • Lastly, add sequins on top of the snowmen, peel off the release sheet from the foam tape, and simply place the ring/acetate piece on top capturing your sequins inside.


Elizabeth Crafts Supplies:
Snowglobe Scene
Fitted Circle Dies
It's Christmas Time Paper By ModaScrap
Snowman & Gifts
Soft Finish Card Stock Soft Sky
Kids Choice Glue

Other Items Used:
Copic Markers
Blue & White Sequin Mix
Foam Strips
Clear Window Sheet Acetate

I hope this has inspired you in some form or fashion. I plan on watching youtube videos to check out alternative ways to create these fun, yet addicting, cards. I have so many ideas running through my head. Leave me a message below and let me know if you have made shakers before. I'd love to see your projects. Hugs, Melanie

Tuesday, November 7, 2017

LDRS Creative Holly Days Stamps & Dies


Hi Friends,

I am getting excited about all the brand new products being released for the holidays....or should I say "Holly Days"? Little Darlings Rubber Stamps has released a beautiful collection of stamps and dies, and everyone knows how much I love DIES!!! Check out my favorite die set from them below. It is called the Holly Wreath Circle Die Set. See the entire collection HERE.  


I love how this dainty floral die fits perfectly with the Holly Days Large Circle Die Set. This sentiment set has room to color in your sentiments to coordinate with your projects. I colored in the leaves and berries on mine so that it would match the paper. Below is a closer look at the entire die/sentiment pairing. I just love it when dies and stamps coordinate don't you????


For my project I have used three of the new products by LDRS Creative. I started with a piece of paper from the Polkadoodles Winter Land 6x6 Paper Stack. From there I choose a coordinating piece of Cherry Cobbler card stock and I die cut this amazing Holly Wreath Circle Die. I stamped out the "Holly Days" circle stamp onto Copic Xpress It paper and I hand colored in the holly in, giving it a rich look. Then I realized that the pierced circle die from the Holly Wreath set PERFECTLY for these circle sentiments so make sure you check them out HERE


I hope this finds you well and inspires you to enjoy your creative side today. Hugs, Melanie


Magnolia-Licious Challenge Blog Post ~ Optional Theme "The Holidays"

Hi There and welcome back!

Today I am sharing with you Magnolia-licious' Monthly Challenge post. This month we have an optional theme for the holidays. I am using Snowy Tilda from the 2015 Lovely Christmas Collection.

Isn't this sweetie adorable in the rich Burgundy's and neutrals? I have stamped and colored her on Copic Xpress It paper and then I fussy cut her out and mounted her onto an oval die set using mini Dimensionals. This just gives her a little lift and extra interest.


I have used numerous Magnolia Doohicky Dies including the Vintage Square set. I also used numerous dies from the Vol. 7 Doohikey Set. The paper is from the Lemon Craft Christmas Carol 6x6" paper stack.  which is available in the Magnolia-licious online store. I also added one of our Pearl Button Flower Centers which I am in love with.... I want them in EVERY COLOR!!! They are so affordable too!

Thank you for visiting all of our Challenge Cards today. I hope you will consider entering your current Magnolia project so we can see it. Happy stamping! Melanie

Friday, November 3, 2017

Magnolia-licious Tilda with Umbrella - Daisy

Hello There,

I am starting off November with a project I am super proud of. This is Magnolia's Tilda w/ Umbrella and she is part of the "Yay - It's Your Birthday 2017" Collection.


As you can see I created an entire scene with this little lady. Following a tutorial from Kit & Clowder online coloring classes. These classes are truly amazing.
 
I have used yellow Foamiran along with some peach stamen from Magnolia-Licious. I cut these flowers out using Whimsy Peony dies and I have colored the Foamiran with Gelatos. 


Here is a close up of the coloring. Everything is drawn in except for Tilda herself. Alyce with Kit & Clowder is an amazing instructor and you could also color like this just by following her videos. 

Thank you for stopping by today and for visiting often. I hope you have a blessed day! Melanie

Friday, October 27, 2017

Elizabeth Craft Designs' Snowflake Card

Welcome Back,

Today I am playing around with the new "Snowflake" dies from Elizabeth Craft Designs' winter collection. I just love how this turned out.


To create this easy project follow these step by step directions:
  1. Cut your darker card stock to 5" x 10" and fold in half creating the card base.
  2. Cut your white background piece to 4 3/4" square
  3. Use light and dark blue inks along with a Tim Holtz sponge, and color over the stencil in various directions to achieve a snowflake background to your linking.


Finished Result Below


4.  Next die cut snowflake dies in desired colors. Cutting 2 of the largest snowflake, glue these two together to create a thicker snowflake. This helps when inking and it gives a sturdy base for the entire design.


5. Using the sponge again sponge the tips of the largest snowflake in light blue ink.


6. Using foam tape, cut in thin pieces and attach to the back of the largest snowflake.  Adhere the snowflake to the card front. This give the snowflake even more dimension.
7. Using Kids Choice glue adhere the snowflake piece together and add a large pearl to the center.
Here is the final result. I hope this inspires you to get those dies out and play. They make the most exquisite projects.


Elizabeth Craft Supplies:
Snowflake Die
Leaf Snowflake Stencil
Kids Choice Glue
Other Supplies:
Navy and white card stock
Light and dark blue ink pads
Tim Holtz Blending tool
Large silver rimmed pearl