A whimsical place to play, where paper and ink become one.

Tuesday, January 31, 2017

Elizabeth Craft Designs Accordion Ovals Card

Hi There,

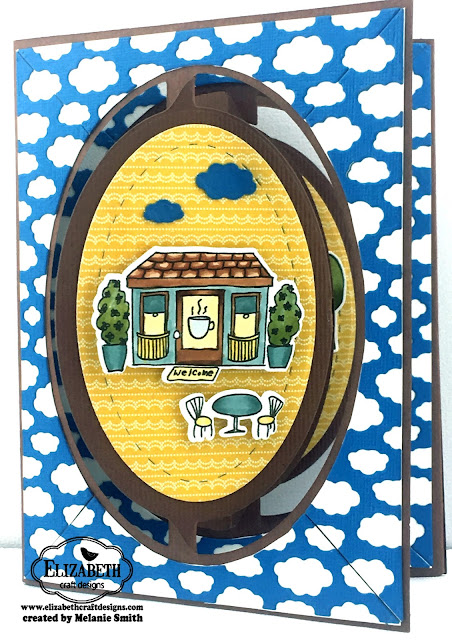
I have something really fun to share with you today from Elizabeth Craft Designs. This is my very first accordion style card using Karen Burniston's Pop It Up Oval Accordion Die set.

I decided to go with an accordion card as soon as I saw this really fun stamp set called "Row Houses". I also used the coordinating Row House Dies which are also available.


I think the Oval Clouds Frame Edges really works well with this stamp set as well. If you saw my post last Tuesday you will see that I used the cut away cloud scraps in that "Critters" scene

Designers Tip: When working with the accordion dies your framed pieces and your center pieces (in this case ovals) off set eachother. If you look closely at the first photo you can see that the background piece first has a valley fold and then a mountain fold. Where as the "oval sections" go from mountain to valley to mountain. Once you realize this then building them and designing with them is a lot of fun.

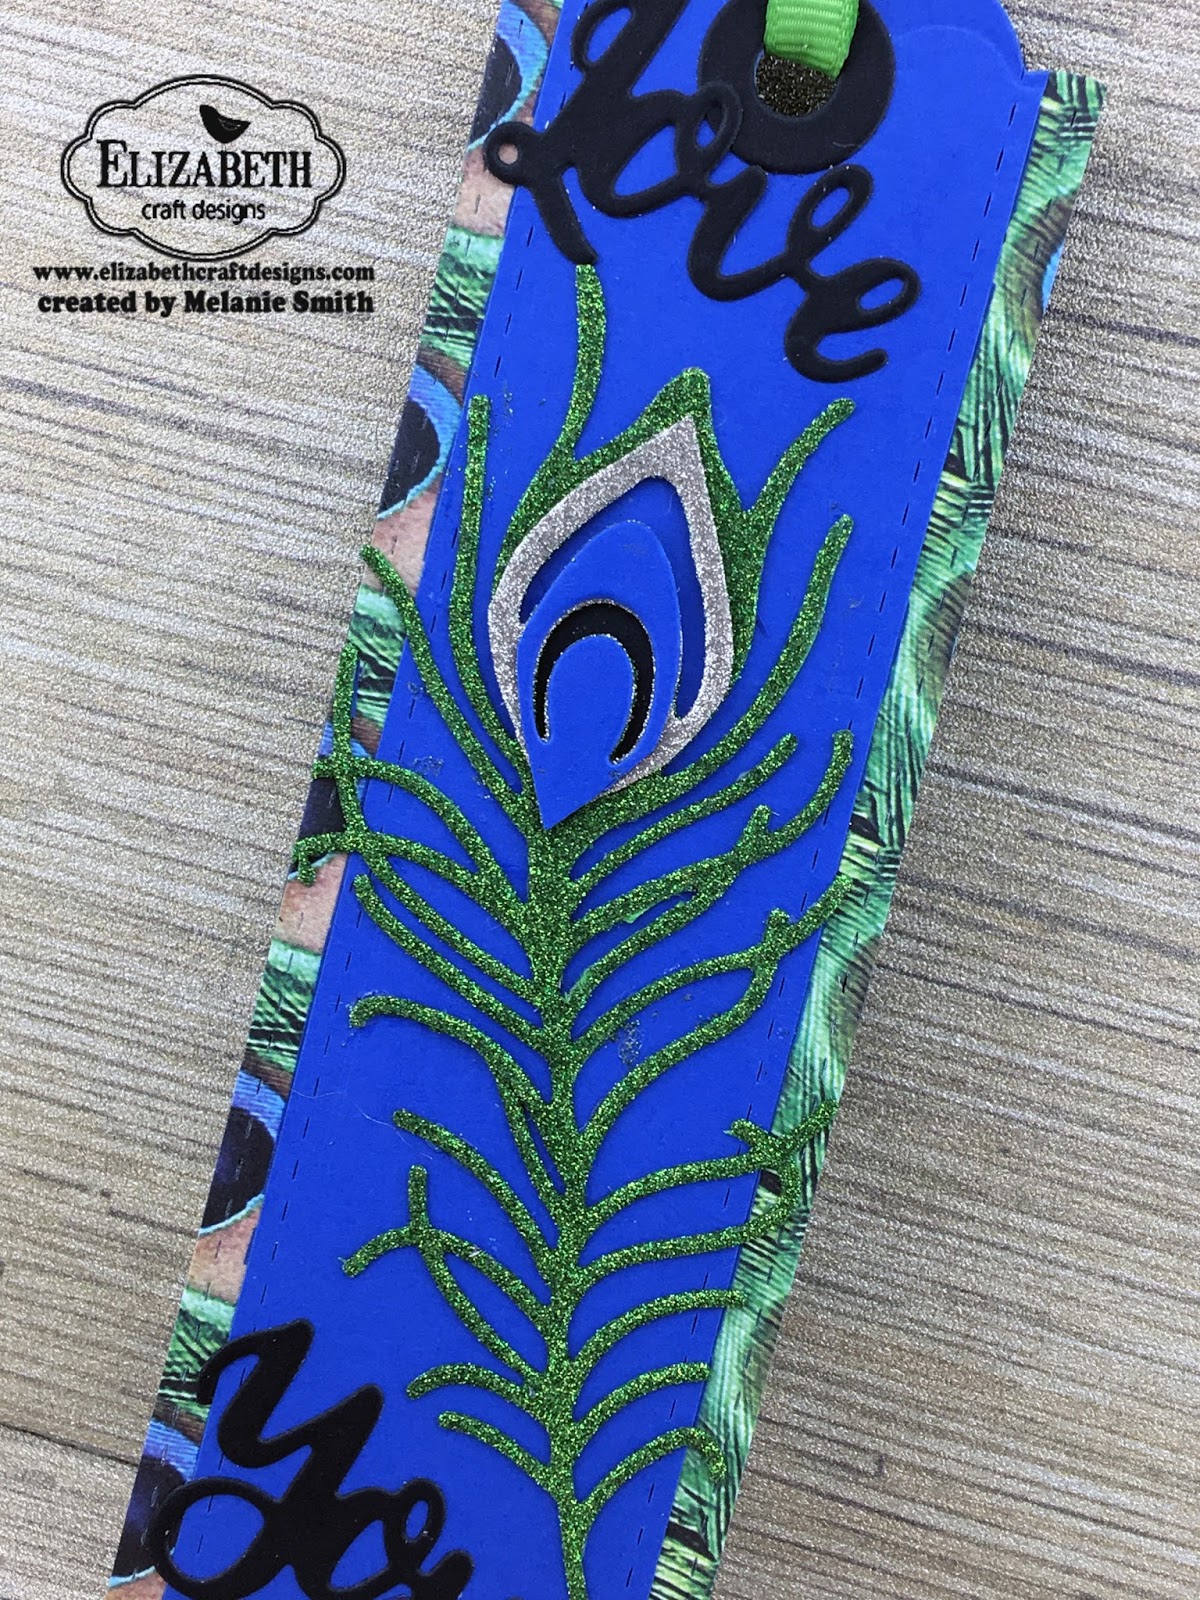
Here is a close up of one section of the accordion. I was really happy at the way all of this went together. 

I currently have more "Accordion" dies sets on my shopping list for my next order. If you would like to order any of these products head on over to the Elizabeth Craft Designs online store. I promise you, you will not be disappointed... these dies and stamps are top quality. 

As always thank you for stopping by today. I hope I have inspired you to design outside the box. Happy Crafting!

Melanie Smith


Friday, January 27, 2017

LDRS Creative "Outdoor Play" Stamp & Die Set

Hi Friends,

Take a look at these adorable new stamp and die sets that LDRS Creative. They were just released last week at CHA.. There are 4 new sets all just released. The set I have chosen to share today is titled "Outdoor Play" and comes with serveral other stamps as well so make sure to check on the website for all the details. These whimsical animals are so precious and are just begging you to color them up.


I decided on a very clean and simple style of card here because I wanted the main focus to be these adorable little Raccoons. Look at them all ready for you to play with them.

I have colored them with Copic Markers and have simply layered two pieces of patterned paper and with a basic die/punch make two holes for the little guys to pop out of. Isn't the wood patterned paper perfect? So adorable!

Make sure to check out ALL the newly released items over in our LDRS Creative online store. I hope you all have a crafty good day!


Melanie


Thursday, January 26, 2017

Elizabeth Craft Designs Peacock Feather Bookmark Tutorial

Hi Friends,

I am here today to share with you a fun bookmark that I made as a gift for my mother. I have created it using the NEWLY released Peacock Feather die from Joset Designs.


As soon as I saw the new Fish Tail Banner Die Set by ModaScrap it screamed to me "Bookmarks!" So that is my focus with this project.

Step 1:

Cut 3 different colored peacock feathers using double sided adhesive sheets. You will want the double sided adhesive  on the front of the green feather. I chose colors of white/ Green / Royal Blue


Step 2:

Trim the white and blue feathers because you only need a tiny bit from each to create the focal portion of the feather.


  Step 3:

Using a coffee filter and the Elizabeth Craft Designs Silk Microfine Glitter. Peel off the release sheet from the feather to reveal the stickiness and cover with Go Go Green Microfine Glitter. Rub/Burnish the glitter and put excess glitter back in container.


Step 4:

Assemble the feather as seen here in this photo. I also used Antique Silver Silk Microfine Glitter on the white piece.


Step 5:

Using the Tags and More 1 - Lace Die cut the top portion of the bookmark.


Step 6:

Using the same Tag die set cut two of the circles using double sided adhesive and attach one on each side to reinforce the hole. Add Ribbon of your choice.

Here is the finished project:


Elizabeth Craft Designs Supply List:

ModaScrap Stitched Fishtail Banner

Els van de Burgt Studio Love Sentiments

Joset Designs Peacock Feather

Els van de Burgt Studio Tags & More 1- Lace

Clear Double Sided Adhesive 10mm and 6x6"

Silk Microfine Glitter - Antique Silver

Silk Microfine Glitter - Go To Green

Thank you for stopping by today. Make sure to check out the entire new release over on the Elizabeth Craft Designs Online Store. Have an amazing day! Melanie

Tuesday, January 24, 2017

Elizabeth Craft Designs Coloring Challenge ~ Critters

Hiya Friends,

I am sharing with you a really fun Elizabeth Craft Designs colored card. We have a brand new coloring challenge starting today. The theme is "critters". We would love to have you participate with us.

Have you seen the brand new line of stamps and dies that we now carry? You must keep an eye out on the "New Arrivals" section of the Elizabeth Craft Designs web store for all the exciting items being released this month. 


Check out this cuteness! I have used the Woodland Pals Stamp set and Woodland Pals die set. This was such fun to color up. I love creating scenes so this set really appealed to me. 


For the "Smile" sentiment I cut the die out numerous times and glued one on top of another until I liked the thickness. I then used a coordinating marker to color the edges. I love the boldness this technique gives you. 

For the clouds I used left over pieces from an oval accordion card I will be sharing in the near future. Such adorable little clouds!

Elizabeth Craft Designs Products used:

Stitched Rectangle Dies

 Smile Die

Oval Clouds Frame Edges   (to create the clouds)

Woodland Pals Stamp Set 

Woodland Pals Die Set

Other Items:

Copic Markers and paper from my stash ;-)

Personal Tip: I love the Stitched Rectangles set because they have both stitched lines as well as dotted rectangles.  I am always looking for the best value for the money and this just gives you more options for the same price as other brands. 

Happy Creating!
Melanie


Sunday, January 22, 2017

Elizabeth Craft Designs Flower Power ~ 8 Step Copic Tutorial

Hi Friends,

I am super excited to share my first project for the Elizabeth Craft Designs coloring design team. I am honored to be chosen and am here today to share with you one of our brand new stamp sets called "Flower Power"


Elizabeth Craft Designs Supplies:

Stamps By Krista Flower Power Stamp & Die Set

ModaScrap's Leafy Branch 3

Els van de Burgt Studio's Love Sentiments

ModaScrap's Lacy Poppies  (For the inside)

Other:

Copic Xpress It paper

Copic Markers R35, R37, & R39


                 Step by step coloring using Copic markers.

   When I color I use a flicking stroke rather than a circular stroke.


In this first photo I have fully colored the top section. We are now going to color a lower petal.


Step 1: Using your lightest color (R35) begin to add color to the area that will be your shadow area. We are wanting the shadow to fall toward the flower center to add depth.


Step 2: with my next darker color (R37) flick over the previous color but not all the way to the edge of the lightest color.


Step 3: Using your darkest color (R39) add in your cast shadows. The deepest portions of the flowers center, as well as any areas that lays behind another are have cast shadows. For example, the petal to the left of the are you are coloring is laying on top of our petal which casts a shadow.


 Step 4: So far we have gone light to dark... Now we are going to reverse our steps. With your middle color go over the cast shadows we just added in step 3 but go farther into the lighter area with your strokes. This begins to blend the colors together.


Step 5: With your lightest color begin in the center and flick out to the edge to fill in the remainder of the petal.


Step 6: Because your light colors tend to get desaturate the darker colors it helps to add in a little more of your darkest colors. With your darkest marker color in your cast shadows once again. (center and underneath the petal to the left)


Step 7: Again use your middle color to go over the darkest color you just added in step 6. Flick out towards the edge but not all the way to the edge.


Step 8: Lastly use your lightest color and flick from center to edge. This gives it one last blend which softens the stroke lines.


Here is a close up of the finished flower.

If you have any questions please do not hesitate to email me at fairystampland@comcast.net 

Happy Coloring!

Melanie


Saturday, January 21, 2017

CHA Release for LDRS Creative...

HI Everyone,

I am here today to share some EXCITING NEWS..... Little Darlings is currently at CHA and I was lucky enough to be able to send in a couple samples which will be there showing off some of the new product. Here is my favorite out of the two projects I got to contribute. 


I just love these "All Dressed Up" stamp sets. This one is called "Everything Stops for Walkies" I have colored her up with Copic markers and I have used one of my favorite LDRS die sets called "Fancy Rectangles & Layers" I used a couple of these on the inside of the card too which gives the card such a finished look on the inside. 

Make sure to check out the entire website as the new line is AMAZING!!!!! Click HERE! 

Thank you to everyone who stopped by today. Happy shopping!!!


Friday, January 20, 2017

Elizabeth Craft Designs Elegant Roses

Hello Friends,

I am back today with a really dainty card. I was playing around with my Elizabeth Craft Designs dies and just fell in love with this new die called "Gatefold - Elegant Roses" from our brand new release. I used my Big Shot to cut out this die and it cut beautifully.


My card size is 6x6" and I started with a pale pink base of card stock. I then found a piece of designer paper from a Authentique 6x6" paper pad. I chose a darker background piece so that the beautiful die would show up well when placed over it.

I cut the Elegant Roses die twice and trimmed a little bit off the straight edge since I wasn't making a gatefold style card. I wanted the Elegant Roses die to be a frilly backdrop for the handmade flowers I was planning on adding.

For the Floral part of the card I have used Leafy Branch 4 from our Moda Scraps Collection and Garden Notes Carnation from the Susan Garden collection. This was the very first time I have made a flower using Susan's Garden Club dies and let me tell you her you tube videos are amazing. Click below to view her Garden Notes Carnation video tutorial.


I used Susan's Flower Making Tool Kit along with her Mini Molding Mat.  to create these two flowers along with the Kid's Choice glue. 

Before gluing the flowers down I dabbled a little of the glue onto the edges of the flowers and using a coffee filter under it I sprinkled some of Elizabeth Craft Designs Cool Diamond Silk Microfine Glitter. After that dried I finished off with some Kid's Choice Glue in the center then I sprinkled Prills into the center.  

All of these amazing products can be purchased over in the Elizabeth Craft Designs web store. I hope you have enjoyed today's post as much as I enjoyed making it for all of you. I hope you will choose to follow my work by clicking on the "follow me" link on the side tool bar. Happy Creating Everyone!

Tuesday, January 17, 2017

Magnolia-licious Sagittarius from the Zodiac Collection

Hi Fellow Stampers,

I am super excited to announce that I'm a brand new member of the Magnolia-licious design team. Most of you probably don't know this but the "Magnolia" line of stamps were, and always have been my favorite stamps. Seeing them colored in a magazine inspired me to purchase my first Copic Markers.

Today I'm using a stamp from the Zodiac collection named Sagittarius  We currently do not have the full size version available in the online store but we do have the mini available if your interested. Please pop on over to the Magnolia-licious Challenge Blog and play along with us and you could win a $20 gift certificate to the Magnolia-licious online store.


Of course I have colored my Magnolia stamp with Copic markers. I have also used dies from the C.C. Design's Make a Card #12 set. I thought this was just perfect for Valentine's Day.

As always...if you enjoy seeing my work I would be honored if you would click on one of the "Follow Me" options on my side bar. Thank you for stopping by and have a beautiful day!

Melanie

Thursday, January 12, 2017

LDRS Creative Fairy Serena

Hello Crafty Peeps,

Today I would like to share with you a sweet fairy card using the Little Darling's Serena Stamp.


This was a really fun stamp to color. I have used Copic markers here. I have also chosen to use the LDRS Magestic Frames die set for the frame in the back, and the Gilded Oval Label dies for the sentiment to sit on. I just had to use the "Darling" wood piece on a LDRS project ;-)

Thank you for stopping by today. If you enjoy my work I would love it if you would click to "follow me" by email. This will send you a notice each and every time I post a new project ;-) 

Melanie

Wednesday, January 11, 2017

Quick Creations House Mouse "Smell the Roses"

Hi Friends,

Today I would like to share a House Mouse project using the stamp called "Smell the Roses" I used one of my favorite color combo's on this card, pink & green.

I have used Bo Bunny's “Soiree” 6” x 6” paper along with LDRS Creative dies and lots of embellishments from my stash.


Here is a close up of my coloring. I just love coloring House Mouse stamps because the artist has guided you on where the shadows should be which makes for easier shading. 


I hope you are having a happy January. Never miss a post!!! Make sure to click on the left hand side of my blog where it says "follow by email" This will allow you to receive my blog posts directly to your inbox.

Tuesday, January 10, 2017

Elizabeth Craft Designs January Die Challenge

HI Friends,

I am excited to announce that I have been chosen by Elizabeth Craft Designs to be a part of both their die and also their color design teams. This is my first post for the die team. I have used two die sets from the NEW January Release. These should be ready for purchase around January 12th


I have used the following Elizabeth Craft Die sets:


I little die cut fussy cutting has been done here to create the heart and birds. I cut the leafy heart piece twice. I carefully cut the pink outlines to create the delicate hot pink outlines on the outside and inside heart shaped borders. I also cut the Love Birds 3 separate times to get the extra leafy portions as well as the two colors for each bird. These two dies go together perfectly.

Check out the entire "Coming Soon" page over on the Elizabeth Craft Designs website to see a bunch of new items coming out in January. 

Have a beautiful day my friends!
Melanie

Wednesday, January 4, 2017

Quick Creations The Greeting Farm Trust in the Lord

Hi There,

Today I am sharing with you a really special card made for Quick Creations. I have used the beautiful stamp set called "Trust in the Lord" by The Greeting Farm. I have paired it up with Elizabeth's Crafts Country Scapes Wisteria Vine die.

When I created this card I actually was creating it for two different reasons. First as a design team card for Quick Creations, and secondly for an entry for a design team call by Elizabeth Craft Designs Die team. This is the first time I have went through a full application process including sending in my samples for viewing. I am ecstatic to announce I did indeed make it onto both of their teams (Coloring & Dies).


This stamp set will be perfect for bible journaling. That is another world that I would like to visit soon. So far all I have done is "collect" items that would be good to use in your bible.

For this card I have colored the stamp with Copic markers and I have used Kaisercraft “Cottage Rose” 6.5” Paper. I even used it for the blossoms. I just loved the way it turned out. 

Thank you for starting the New Year off by visiting my blog. I hope you will consider following me by email. Just add your email in the box to the left of this post.